Once you’ve installed Virtualmin on your server, the next step is to add websites — or more specifically, create Virtual Servers (which is what Virtualmin calls website accounts).
Whether you’re managing a personal site or hosting clients, this guide will show you how to add a fully functional website in Virtualmin.
✅ What You Need Before Adding a Website
Before you create a website in Virtualmin, make sure:
- Your domain name is registered
- DNS is pointed to your server (or will be configured)
- Apache and BIND (DNS server) are enabled
- You’re logged in to Virtualmin as
rootoradmin
Need a Virtualmin-optimized server?
👉 Explore high-performance hosting at Servers9
🧭 Step-by-Step: Add a Website in Virtualmin
🔹 1. Log in to Virtualmin
Access your Virtualmin panel at:
arduinoCopyEdithttps://your-server-ip:10000
Login with:
- Username:
root(or admin) - Password: your root password
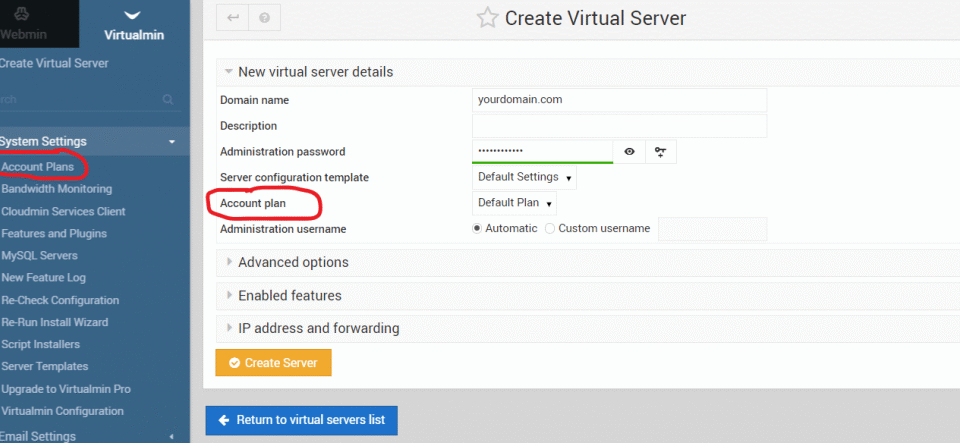
🔹 2. Create a New Virtual Server
From the left sidebar:
- Go to Create Virtual Server
- Fill out the following fields:
➤ Domain Name
Your website domain (e.g., example.com)
➤ Administration Password
Set a strong password (this becomes the user’s password)
➤ Features to Enable
Ensure the following are checked (as needed):
Apache websiteSSL website(for HTTPS)MySQL database(if you need a database)Mail for domain(if email is required)
Click Create Server when done.
✅ This creates:
- Web root:
/home/example/public_html/ - A system user:
example - FTP, mail, and DB access (based on selected features)
🔹 3. Upload Your Website
You can now:
- Upload files via File Manager
- Or use SFTP/FTP to
/home/example/public_html/
🔹 4. Add DNS Records (If Hosting DNS)
If you manage DNS in Virtualmin:
- Go to Server Configuration > DNS Records
- Verify:
- A record:
@ → your server IP - CNAME/WWW record
- MX records if using mail
- A record:
Or update DNS at your domain registrar.
🔹 5. Enable SSL (Recommended)
- Go to Server Configuration > SSL Certificate
- Choose Let’s Encrypt
- Request SSL for:
example.comwww.example.com
- Click Request Certificate
✅ Your site is now secured with HTTPS.
🧪 Optional: Add Subdomains or Aliases
- Use Sub-server under “Create Virtual Server” for subdomains (e.g.,
blog.example.com) - Use Alias Server for redirect-style clones (e.g.,
example.net→example.com)
✅ That’s It!
Your website is now fully added in Virtualmin and ready to launch.
From here, you can:
- Install WordPress or any CMS
- Manage email accounts
- Create databases and manage DNS
💡 Quick Tips
- PHP version can be changed per domain:
Server Configuration > PHP Versions - Logs and stats are available under:
Logs and Reports > Apache Access Log / Error Log - Backups can be configured via:
Backup and Restore
⚡ Need High-Performance Hosting?
Want your websites to load faster and scale better on Virtualmin?